A comprehensive guide to mastering manual camera settings, this cheat sheet explains aperture, ISO, and shutter speed. Perfect for photographers seeking quick reference and improved techniques.
Understanding the Basics of Manual Mode
Manual mode offers full control over camera settings, allowing photographers to adjust aperture, ISO, and shutter speed independently. This mode is ideal for creative control and consistent results. Mastering manual mode requires understanding the exposure triangle, which balances light intake and image brightness. Start by setting ISO for sensitivity, aperture for depth of field, and shutter speed for motion effects. Use the camera’s light meter as a guide, then fine-tune settings for desired results. Practice with a cheat sheet to streamline the process and achieve professional-quality photos effortlessly. Experimentation and patience are key to mastering manual mode effectively.
Why Use a Camera Settings Cheat Sheet?
A camera settings cheat sheet simplifies the learning process, offering quick access to essential manual mode settings. It provides a streamlined reference for aperture, ISO, and shutter speed, helping photographers balance exposures effortlessly. Perfect for beginners and pros alike, it reduces guesswork and saves time. The cheat sheet acts as a handy guide, ensuring optimal image capture in various lighting conditions. By condensing complex concepts into an easy-to-use format, it accelerates the mastering of manual mode. Carry it as a portable tool to improve your photography skills and never miss a shot due to uncertainty.
The Exposure Triangle
Aperture, Shutter Speed, and ISO form the Exposure Triangle, each controlling light intake. Balancing these elements is crucial for achieving desired photographic effects. A cheat sheet simplifies this process, helping photographers master manual settings for optimal image control.
Aperture: Controlling Light and Depth of Field
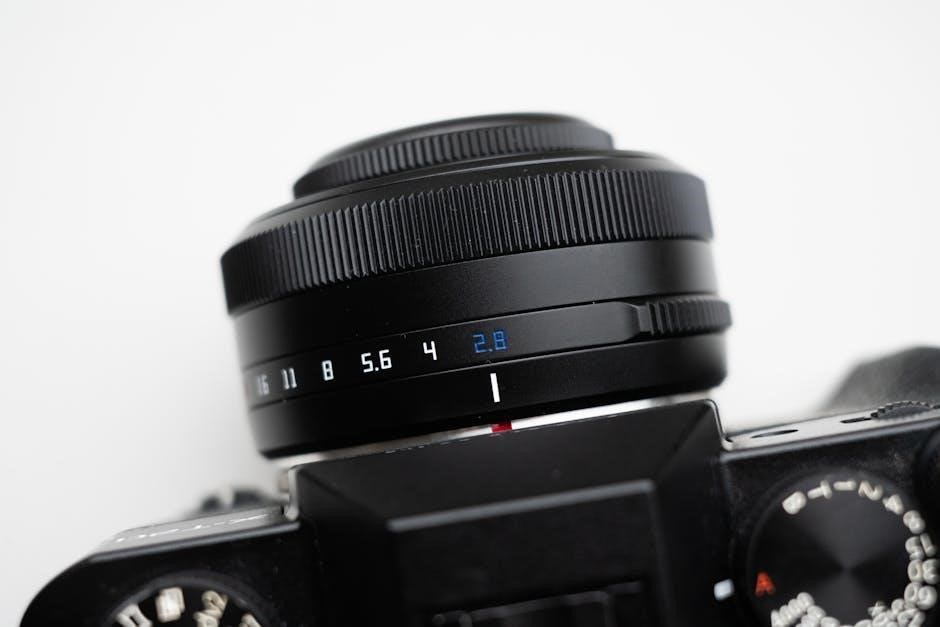
Aperture regulates light entry and depth of field. Measured in f-stops (e.g., f/2.8 or f/16), a lower f-stop means a wider aperture, admitting more light and blurring the background. A higher f-stop narrows the aperture, increasing depth of field and keeping more of the image sharp. This setting is crucial for creative control, allowing photographers to isolate subjects or capture expansive landscapes. A cheat sheet provides quick reference for selecting the right aperture to achieve desired effects, ensuring proper exposure and focus in various shooting scenarios.
Shutter Speed: Freezing or Blurring Motion
Shutter speed determines how motion is captured. Faster speeds (e.g., 1/2000th of a second) freeze action, ideal for sports or wildlife. Slower speeds (e.g., 1 second) create motion blur, adding artistic effects. Longer exposures can capture light trails or silky water. Balancing shutter speed with aperture and ISO is key for proper exposure. A cheat sheet helps photographers quickly select the right speed for their creative goals, whether sharp images or dynamic motion effects. Understanding shutter speed enhances control over how movement is represented in photos.
ISO: Camera Sensitivity to Light
ISO controls the camera’s sensitivity to light. Lower ISOs (e.g., 100-400) are ideal for bright lighting, ensuring minimal noise. Higher ISOs (e.g., 6400-51200) are used in low-light conditions but may introduce digital noise. Balancing ISO with aperture and shutter speed is crucial for optimal exposure. A lower ISO generally produces cleaner images, while higher ISOs can help capture photos in dim environments. Using a cheat sheet helps photographers quickly identify the right ISO for their scene, minimizing noise and maximizing image quality. Adjust ISO carefully to maintain detail and avoid unwanted grain in your photos.
Aperture Settings
Aperture regulates light entry and depth of field. Lower f-stops (e.g., f/2.8) create a shallow focus, while higher f-stops (e.g., f/16) sharpen the entire image. Use a cheat sheet to master aperture settings for precise control over your photos.
How Aperture Affects Depth of Field
Aperture is crucial for controlling depth of field in photography. A lower f-stop value (e.g., f/2.8) opens the lens wider, allowing more light and creating a shallow depth of field, which blurs the background and emphasizes the subject. Conversely, a higher f-stop (e.g., f/16) narrows the aperture, resulting in a deeper depth of field where more of the image is in focus. This makes higher f-stops ideal for landscapes or group portraits, while lower f-stops are perfect for portraits or isolating subjects. Referencing a manual camera settings cheat sheet can help photographers quickly determine the right aperture for their desired effect.
Common Aperture Values and Their Uses
Common aperture values range from f/1.4 to f/16, each serving different purposes. Wide apertures like f/1.4 or f/2.8 create a shallow depth of field, ideal for portraits where the subject stands out. Medium apertures, such as f/4 or f/5.6, balance depth of field and light intake, suitable for street or family photos. Narrow apertures like f/8, f/11, or f/16 ensure sharpness across the image, perfect for landscapes or product photography. A manual camera settings cheat sheet is invaluable for quick reference, helping photographers choose the right aperture for their creative goals.
Shutter Speed Settings
Shutter speed controls motion capture, with fast speeds freezing action and slow speeds creating blur. A cheat sheet helps photographers select the ideal speed for dynamic results.
Understanding Fast and Slow Shutter Speeds
Shutter speed determines how long the camera’s shutter remains open, affecting motion capture. Fast shutter speeds (1/500th of a second or faster) freeze action, ideal for sports or sharp images. Slow shutter speeds (1 second or slower) create blur, often used for artistic effects like flowing water or light trails. A cheat sheet helps photographers balance these speeds with aperture and ISO for optimal exposure. Understanding fast and slow speeds is crucial for controlling motion and achieving desired visual effects in various photography scenarios.
- Fast speeds: Sharper images, less blur, ideal for action.
- Slow speeds: Creative blur, motion effects, artistic results.
Creating Motion Effects with Shutter Speed
Shutter speed is a powerful tool for creating dynamic motion effects in photography. Slow speeds (1/30th of a second or slower) introduce intentional blur, capturing movement like flowing water or light trails. Fast speeds (1/500th of a second or faster) freeze action, ideal for sharp images of moving subjects. A cheat sheet helps photographers experiment with these techniques, balancing blur and sharpness to convey motion. By mastering shutter speed, photographers can add artistic expression to their images, whether it’s a silky waterfall or a crisp sports moment.
- Panning: Track moving subjects with a slow shutter speed for a sharp subject and blurred background.
- Light trails: Use long exposures to capture streaks of light from moving vehicles or stars.
- Waterfalls: Slow speeds create a smooth, flowing effect in water.
ISO Settings
ISO adjusts the camera’s light sensitivity, affecting exposure and noise levels. Lower ISOs (100-400) suit bright conditions, while higher ISOs (6400-12800) capture images in low light. Use wisely for optimal quality.
Understanding ISO Sensitivity
ISO sensitivity determines how responsive your camera’s sensor is to light. Lower ISO values (100-400) are best for bright lighting, ensuring sharp images with minimal noise. Higher ISOs (6400-12800) are ideal for low-light conditions but may introduce grain or digital noise. Adjusting ISO balances exposure and image quality. Using the lowest possible ISO for the lighting conditions minimizes noise and ensures crisp, detailed photos. Understanding ISO sensitivity is crucial for mastering manual mode and achieving professional results in various lighting scenarios.
Balancing ISO for Optimal Image Quality
Balancing ISO is essential for achieving optimal image quality. Use lower ISOs (100-400) in bright lighting to minimize noise and ensure sharp, detailed photos. In low-light conditions, higher ISOs (6400-12800) are necessary but may introduce grain. Always aim for the lowest ISO suitable for the scene to reduce digital noise. Adjust ISO alongside aperture and shutter speed to maintain proper exposure. For instance, in daylight, ISO 100-400 is ideal, while indoor events may require ISO 800-3200. Experimenting with ISO balancing ensures vibrant, professional-looking images in any setting.
White Balance and Color Temperature
White balance adjusts color temperature to match lighting conditions, ensuring accurate hues. The Kelvin scale measures this, from warm (e.g., 2800K) to cool tones (e.g., 7500K), enhancing image appeal.
Understanding Kelvin Scale for Color Temperature
The Kelvin scale measures color temperature, ranging from warm (1,800K-3,000K) to cool tones (5,500K-10,000K). Lower Kelvin values mimic candlelight, while higher values reflect daylight. Adjusting white balance using this scale ensures accurate color representation. Common settings include tungsten light (3200K) and daylight (5500K). Fine-tuning this balance enhances image realism and mood, with warm tones evoking intimacy and cool tones creating calmness. Understanding the Kelvin scale helps photographers match lighting conditions, ensuring consistent and visually appealing colors in their work.
Adjusting White Balance for Accurate Colors
White balance ensures colors appear natural by matching the light source’s color temperature. Presets like Daylight (5500K) and Tungsten (3200K) simplify adjustments. For precision, use the custom white balance setting by capturing a neutral object (e.g., a gray card) under the lighting conditions. This calibration ensures accurate hues, reducing unwanted color casts. Fine-tuning white balance enhances realism and mood in images, making it a critical step for professional results. Experimenting with these settings helps photographers achieve consistent and visually appealing color reproduction across various lighting scenarios.
Depth of Field and Focus
Mastering depth of field and focus is essential for controlling image composition. Aperture, focal length, and distance regulate the area in focus, while manual or autofocus ensures sharpness and subject emphasis.
Mastering Depth of Field with Aperture
Aperture is a critical factor in controlling depth of field, which determines how much of your image is in focus. A wide aperture (low f-stop value) creates a shallow depth of field, blurring the background and emphasizing your subject. Conversely, a narrow aperture (high f-stop value) keeps more of the image sharp, ideal for landscapes or group portraits. Understanding how aperture affects depth of field allows you to creatively control the visual narrative of your photos. Experiment with different settings to achieve the desired effect, ensuring your subject stands out or blends seamlessly with the environment.
Using Manual Focus for Precise Control
Manual focus offers precise control over your image’s sharpness, allowing you to dictate exactly where the lens focuses. Unlike autofocus, manual focus ensures accuracy, especially in low-light conditions or with complex compositions. To use it effectively, adjust the focus ring on your lens slowly and deliberately, checking your camera’s focus peaking or magnification tools for confirmation. This method is ideal for portrait photography, where sharp eyes are critical, or for macro shots requiring extreme detail. Mastering manual focus enhances your creative control, enabling you to capture images exactly as you envision them.
Advanced Camera Settings
Explore exposure compensation for adjusting brightness and bracketing to capture multiple exposures. These tools refine lighting and detail, enhancing your control over complex scenes and lighting conditions.
Exposure Compensation: Adjusting Brightness
Exposure compensation allows you to fine-tune image brightness by adjusting the camera’s automatic settings. Use the +/- button to increase or decrease exposure in increments of 1/3 or 1/2 stops. This tool is invaluable for correcting scenes with challenging lighting, such as backlit subjects or high-contrast environments. Overexposure can wash out details, while underexposure may lose shadows. By applying compensation, you ensure balanced brightness and preserve image quality. It’s a quick way to enhance your photos without adjusting aperture or shutter speed. Ideal for refining shots in manual or semi-manual modes, exposure compensation helps achieve the desired visual impact effortlessly.
Bracketing: Capturing a Range of Exposures
Bracketing involves capturing multiple shots of the same scene at different exposure levels. This technique is ideal for high-contrast situations, ensuring detail in both bright and dark areas. Auto Exposure Bracketing (AEB) automatically takes 3-5 shots at varying exposures, while manual bracketing allows customization. Use increments like ±1/3 or ±1 stop for subtle adjustments. Bracketing is perfect for HDR photography or merging images later. It provides flexibility in post-processing, letting you choose the best exposure or combine shots for optimal dynamic range. This feature is a must-use for landscapes, interiors, or scenes with extreme lighting conditions.
Practical Tips for Using Manual Mode
Start with the exposure triangle, use a cheat sheet for quick reference, and adjust settings incrementally to achieve desired results. Practice regularly for better control.
Step-by-Step Guide to Shooting in Manual
Set your camera to Manual Mode (M).
Adjust aperture based on desired depth of field.
Set ISO according to lighting conditions.
Adjust shutter speed to freeze or blur motion.
Check exposure using the built-in light meter.
Make adjustments as needed for optimal results.
Review the image and refine settings if necessary.
This systematic approach ensures control over every aspect of your photography, helping you capture images that match your creative vision.
Common Mistakes to Avoid in Manual Mode
Forgetting to adjust ISO for changing light conditions can lead to under or overexposed images. Overlooking exposure compensation settings may result in inconsistent brightness. Neglecting to monitor battery levels can disrupt your shoot. Not using manual focus when necessary can cause blurry subjects. Ignoring the light meter may lead to improper exposure. Relying too much on auto-settings defeats the purpose of Manual Mode. Being unaware of these common pitfalls can hinder your photography progress. By addressing these mistakes, you can gain better control over your camera and achieve professional-quality results consistently.
Cheat Sheet for Common Shooting Scenarios
A handy reference guide for various photography scenarios, offering quick tips for settings like portraits, landscapes, and action shots to ensure optimal results in any situation.
Portrait Photography Settings
For portraits, use a wide aperture like f/1.8 to f/2.8 to blur backgrounds and emphasize your subject. Set shutter speed between 1/100s to 1/200s to freeze motion. Keep ISO low (100-400) for minimal noise. Use white balance to match lighting conditions for natural skin tones. Enable manual focus for precise sharpness on your subject’s eyes. A full-frame sensor or prime lens enhances depth of field control. Adjust settings based on lighting to ensure balanced exposure and flattering results. This setup creates professional-looking portraits with a shallow depth of field and vibrant colors.
Landscape Photography Settings
For landscape photography, use a narrow aperture like f/8 to f/11 to ensure a wide depth of field; Set shutter speed between 1/30s to several seconds to capture motion or blur. Keep ISO low (100-400) for minimal noise. Use white balance to match lighting conditions for accurate colors. Enable manual focus for precise sharpness across the image. A tripod is essential for stability, especially with slower shutter speeds. Adjust exposure settings to balance the exposure triangle for optimal results. These settings help capture sharp, detailed landscapes with vibrant colors and textures.
Street and Action Photography Settings
For dynamic street and action photography, use a fast shutter speed of 1/500s to 1/2000s to freeze motion. Choose a medium aperture (f/5.6 to f/8) for sharpness and context. Keep ISO low (100-1600) for minimal noise. Use continuous autofocus (AI Servo) for tracking subjects. Burst mode captures action sequences. Adjust white balance for accurate colors in varying light. Underexpose by 1/3 stops for contrast. A wider angle lens (24-50mm) frames the scene. These settings ensure crisp, well-lit images with a sense of motion and storytelling in fast-paced environments.
Mastering manual camera settings enhances your photography skills. This cheat sheet guides you through aperture, ISO, shutter speed, and white balance for optimal results. Download and practice for better photos.
Final Tips for Mastering Manual Camera Settings
Consistently practicing with your camera and referring to a cheat sheet will refine your skills. Understand the exposure triangle and experiment with aperture, ISO, and shutter speed. Use manual focus for precision, and explore techniques like bracketing for dynamic range. Regularly review your photos to identify improvements. Stay updated with new methods and tools to enhance your photography journey. With patience and dedication, you’ll master manual settings and capture stunning images effortlessly. The cheat sheet serves as a quick guide, so keep it handy for instant reference in any shooting scenario.
Downloading and Using the Manual Camera Settings Cheat Sheet
Download the manual camera settings cheat sheet in PDF format for quick reference. This guide provides detailed explanations of aperture, ISO, and shutter speed, along with practical examples. Print or save it on your device for easy access during photoshoots. Use the cheat sheet to master the exposure triangle and improve your photography skills. It also includes tips for balancing settings and avoiding common mistakes. Refer to it regularly to refine your techniques and ensure optimal image quality in various lighting conditions. The cheat sheet is a valuable tool for photographers of all skill levels, helping you capture stunning images with confidence.